
I absolutely adore sharing this Hawaiian Butter Mochi with Ube Recipe because it captures everything I love in a dessert: chewy, buttery, and bursting with that vibrant purple ube flavor balanced by creamy coconut notes. Every bite feels like a little celebration of tropical sweetness and comforting texture, and the best part is how simple it is to make. Trust me, once you try this, it’ll become one of your favorite go-to treats for any occasion.
Why You'll Love This Hawaiian Butter Mochi with Ube Recipe
What really stands out to me about this recipe is the unique combination of flavors and the magical texture it delivers. The ube puree brings this lovely, natural purple hue with a subtly sweet and earthy taste, while the coconut milk adds a rich creaminess that I find irresistible. Together, they create this melt-in-your-mouth chewiness that’s unlike any other dessert I’ve had—the kind that keeps you going back for just one more piece.
Another reason I'm so passionate about this Hawaiian Butter Mochi with Ube Recipe is how easy it is to put together. I appreciate recipes that don’t require a million steps or obscure ingredients, and this one fits the bill perfectly. You mix your dry and wet ingredients separately, then combine and bake. That’s it! It makes it a stellar choice for both weeknight treats and special gatherings. Plus, it’s lovely to serve warm or at room temperature, making it super versatile for any occasion.
Ingredients You'll Need
Each ingredient in this recipe is simple but essential, contributing to the perfect mochi texture, that silky butter richness, or the beautiful purple color and flavor from ube. Using sweet rice flour ensures the chewiness, while coconut milk and butter bring a luscious depth that’s just unbeatable.
- Sweet rice flour mochi flour: This is the key to the chewy, sticky texture that defines mochi.
- Granulated sugar: Adds just the right amount of sweetness without overpowering the ube flavor.
- Baking powder: Helps the mochi rise slightly, giving a lightness to the otherwise dense texture.
- Salt: Enhances all the flavors and balances the sweetness.
- Coconut milk: Brings tropical richness and moisture, complementing the ube perfectly.
- Whole milk: Adds creaminess and helps achieve the right batter consistency.
- Unsalted butter, melted: Provides buttery goodness, making every bite decadent and tender.
- Ube puree or extract: Infuses the mochi with its signature purple color and that subtle, sweet, earthy ube flavor.
- Large eggs: Bind everything together while lending a slight fluffiness.
- Vanilla extract: Adds warmth and depth, enhancing all the flavors.
Directions
Step 1: Preheat your oven to 350°F (175°C) and grease a 9x13 inch baking dish with butter or cooking spray. This helps the mochi release easily and prevents sticking.
Step 2: In a large mixing bowl, whisk together the sweet rice flour, sugar, baking powder, and salt until they’re well combined. This ensures an even distribution of ingredients for consistent texture and flavor.
Step 3: In a separate bowl, mix the coconut milk, whole milk, melted butter, ube puree, eggs, and vanilla extract until smooth and fully blended. This creates a beautifully velvety wet mixture that will turn into pure magic once baked.
Step 4: Gradually pour the wet ingredients into the dry ingredients, stirring until just combined. I make sure not to overmix here because a few lumps in the batter actually make for a nicer, chewier mochi.
Step 5: Pour the batter into the prepared baking dish, then spread it out evenly with a spatula to ensure it cooks uniformly.
Step 6: Bake in the preheated oven for 45-50 minutes, or until the top is a lovely golden brown and a toothpick inserted into the center comes out clean. This timing delivers that perfect chewy but fully cooked texture.
Step 7: Let the mochi cool in the pan for about 10 minutes before slicing into squares. I like to serve it warm to enjoy the gooey softness, but it’s equally delicious at room temperature.
Servings and Timing
This Hawaiian Butter Mochi with Ube Recipe makes approximately 12 servings, perfect for sharing at family gatherings or potlucks. The prep time is around 15 minutes, giving you plenty of time to mix your ingredients without rush. Baking takes about 50 minutes, so plan for a total time of roughly 1 hour and 5 minutes from start to finish. Allowing the mochi to cool for 10 minutes after baking helps it set nicely before slicing and serving.
How to Serve This Hawaiian Butter Mochi with Ube Recipe
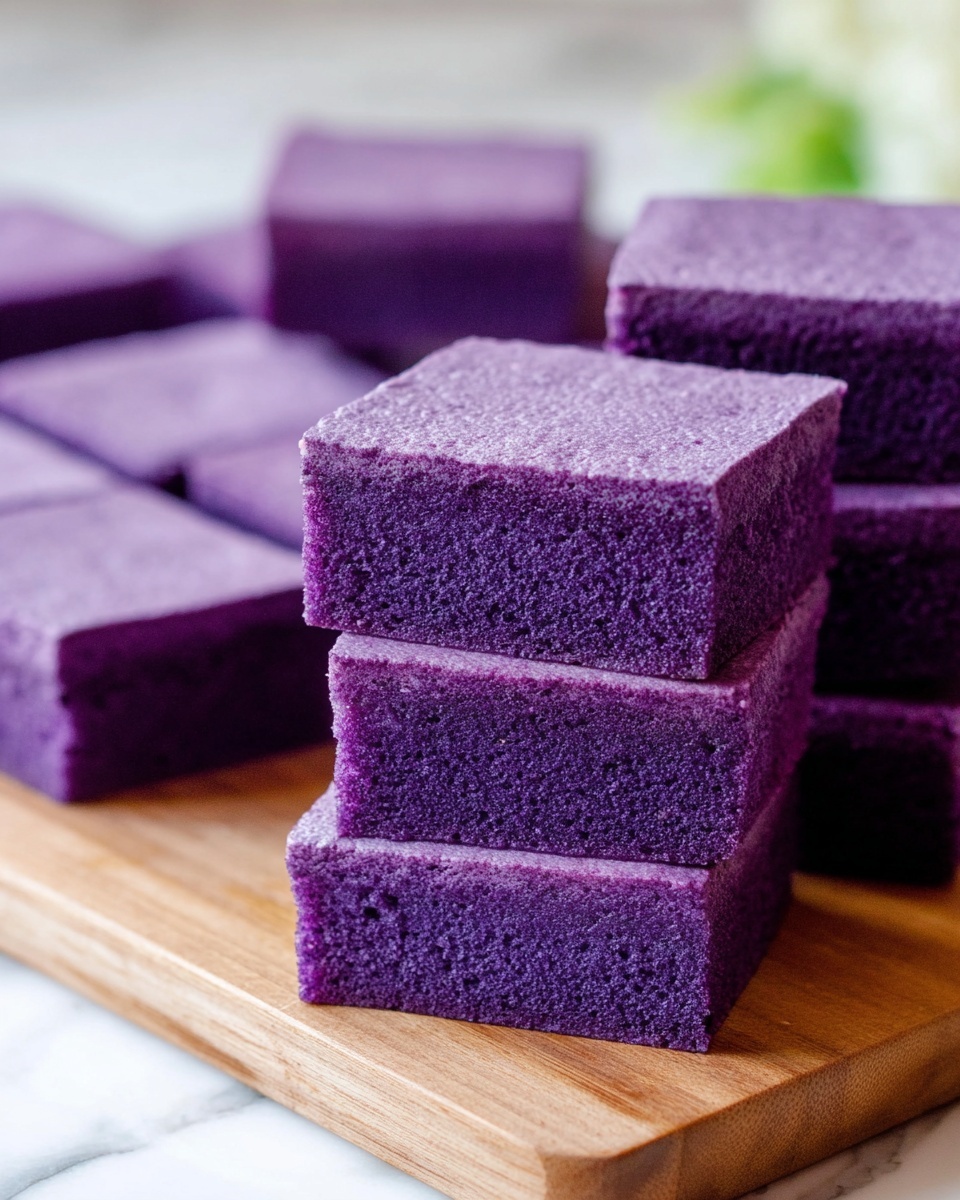
When I serve this mochi, I love pairing it with a cup of strong, black coffee or a lightly sweetened green tea. The bitterness of the coffee beautifully contrasts the rich sweetness of the ube and coconut, while the tea cleanses the palate between bites. I also find it makes a stunning addition to any dessert spread at holiday parties, where its vibrant color always grabs attention.
For presentation, I often sprinkle some toasted shredded coconut or chopped macadamia nuts on top just before serving to add a little texture and extra tropical flair. Cutting the mochi into bite-sized squares lets everyone enjoy it easily, and placing it on a bright, floral or bamboo serving platter really brings out the Hawaiian vibe. It’s delightful served warm, but I’ve also enjoyed it chilled for a firmer, fudge-like texture during hot summer days.
This dessert is incredibly versatile and works wonderfully as an after-dinner treat during family dinners or even for casual snacks when you want something sweet but not too heavy. No matter the occasion, it always feels special and satisfying.
Variations
Over time, I’ve experimented with a few twists on the Hawaiian Butter Mochi with Ube Recipe to keep things interesting. If you can’t find ube puree, I’ve substituted it with matcha powder for a green tea mochi or even a touch of cocoa powder for a chocolate version. Both turn out delicious and offer a fun change in flavor and color.
For those who want to make this vegan, swapping out whole milk for extra coconut milk and using flax eggs instead of chicken eggs can work well. I also recommend using vegan butter to keep that buttery richness intact, though the texture may be just a touch different. And if gluten is a concern, rest assured that sweet rice flour is naturally gluten-free, so you’re good to go!
Another variation I love trying is adding a pinch of cinnamon or nutmeg into the batter for a warm spice undertone. Alternatively, mixing in some shredded coconut or chopped nuts right into the batter before baking adds delightful texture and bursts of flavor with every bite. You can also experiment with baking in muffin tins for individual portions or even turning this into mini mochi bites.
Storage and Reheating
Storing Leftovers
I store leftover mochi in an airtight container at room temperature if I plan to eat it within 1-2 days. For longer storage, I keep them covered in the refrigerator, where they last about 4-5 days. Using containers with a tight seal is key to preventing the mochi from drying out and losing that signature chewiness.
Freezing
This mochi freezes quite well, which is great if you want to make it ahead of time. I cut the mochi into individual squares and place parchment paper between layers in a freezer-safe container or zip-top bag to prevent sticking. It keeps nicely frozen for up to 2 months. When you’re ready to enjoy it, simply thaw at room temperature or in the refrigerator overnight.
Reheating
When reheating leftover mochi, I prefer warming it gently in a microwave for about 15-20 seconds to revive the soft, chewy texture. Avoid overheating, as that can dry it out or make it tough. Alternatively, you can warm individual pieces in a warm oven for a few minutes. I steer clear of stovetop reheating because it can toughen the surface. The goal is to restore the moist, buttery softness that makes this mochi so special.
FAQs
Can I use ube extract instead of ube puree?
Yes, you can use ube extract if you can’t find ube puree. Since extract is more concentrated, start with about 1 to 2 teaspoons and adjust according to your taste. The color might be less vibrant, but the flavor will still shine through beautifully.
Is sweet rice flour the same as regular rice flour?
Not quite. Sweet rice flour, also known as mochiko, is made from glutinous rice and has a sticky, chewy quality perfect for mochi. Regular rice flour comes from non-glutinous rice and won’t give you the same texture. For this recipe, sweet rice flour is essential.
Can I make this recipe dairy-free?
Definitely! You can replace whole milk with additional coconut milk or your favorite plant-based milk. Swap melted butter for vegan butter or coconut oil. Using flax eggs (ground flaxseed mixed with water) instead of regular eggs will help keep the moisture and binding properties.
How chewy should the Hawaiian Butter Mochi with Ube be?
The mochi should be tender yet chewy — think soft, gummy, and slightly springy. It’s not like cake or bread; instead, it should have a dense but silky texture that pulls away smoothly without being tough or rubbery.
Can I add toppings like nuts or coconut flakes?
Absolutely! Adding toasted shredded coconut, chopped macadamia nuts, or even sesame seeds on top before baking gives a wonderful crunch and complements the tropical flavors. You can also sprinkle powdered sugar or drizzle with sweetened condensed milk for extra indulgence after baking.
Conclusion
I truly hope you give this Hawaiian Butter Mochi with Ube Recipe a try because it embodies that perfect mix of comforting texture and vibrant, tropical flavor that’s hard to resist. It’s one of those desserts that feels fancy yet is surprisingly easy to make, so whether for a special celebration or just a sweet treat after dinner, it’s sure to bring a big smile. From my kitchen to yours, enjoy every chewy, buttery bite!

Hawaiian Butter Mochi with Ube Recipe
Hawaiian Butter Mochi with Ube is a delectably chewy dessert that perfectly blends the creamy flavors of coconut milk and vibrant ube. This easy-to-make treat offers a unique and delightful twist on traditional mochi, baked to a golden finish with a soft, tender texture. Ideal for dessert lovers seeking a taste of Hawaiian-inspired sweets.
- Prep Time: 15 minutes
- Cook Time: 50 minutes
- Total Time: 1 hour 5 minutes
- Yield: 12 servings
- Category: Dessert
- Method: Baking
- Cuisine: Hawaiian
Ingredients
Dry Ingredients
- 2 cups sweet rice flour (mochi flour)
- 1 cup granulated sugar
- 1 teaspoon baking powder
- ½ teaspoon salt
Wet Ingredients
- 1 cup coconut milk
- 1 cup whole milk
- ½ cup unsalted butter, melted
- 1 cup ube puree or ube extract for flavor
- 4 large eggs
- 1 teaspoon vanilla extract
Instructions
- Preheat Oven and Prepare Pan: Preheat your oven to 350°F (175°C). Grease a 9x13 inch baking dish thoroughly with butter or cooking spray to prevent sticking.
- Combine Dry Ingredients: In a large mixing bowl, whisk together the sweet rice flour, granulated sugar, baking powder, and salt until they are evenly blended.
- Mix Wet Ingredients: In a separate bowl, blend coconut milk, whole milk, melted butter, ube puree, eggs, and vanilla extract until the mixture is smooth and homogeneous.
- Combine Wet and Dry: Gradually pour the wet mixture into the dry ingredients, stirring gently just until combined. It’s important not to overmix—leaving a few lumps is acceptable and will help maintain the dessert's texture.
- Pour Batter into Baking Dish: Transfer the batter into the prepared baking dish, spreading it evenly to ensure uniform cooking.
- Bake: Place the baking dish in the preheated oven and bake for 45-50 minutes. The butter mochi is done when the top turns golden brown and a toothpick inserted in the center comes out clean.
- Cool and Serve: Allow the butter mochi to cool in the pan for about 10 minutes. Slice into squares and serve warm or at room temperature for the best texture and flavor experience.
Notes
- For a richer flavor, add a pinch of cinnamon or nutmeg to the batter before baking.
- You can substitute ube puree with other flavors like matcha or chocolate to create unique variations.
- Sprinkle shredded coconut or chopped nuts on top before baking for added texture and flavor.



Leave a Reply